Artificial intelligence is rapidly infiltrating all technology areas, leaving its mark on various projects. Upscaling images is no exception, as AI can now enlarge images without any quality loss and even enhance their beauty. One such tool is Upscale software, which we have tried and tested, and the results are truly remarkable. This article will delve deeper into this tool and explain how it functions.
AI takes image editing to the next level.
Enlarging images can often lead to questionable or unsightly results unless you have advanced skills in graphic design. However, Upscayl aims to resolve this issue with its remarkable artificial intelligence technology. Its promise is simple: to resize various media types (photos, drawings, videos, etc.) without compromising on quality and even improve their definition.
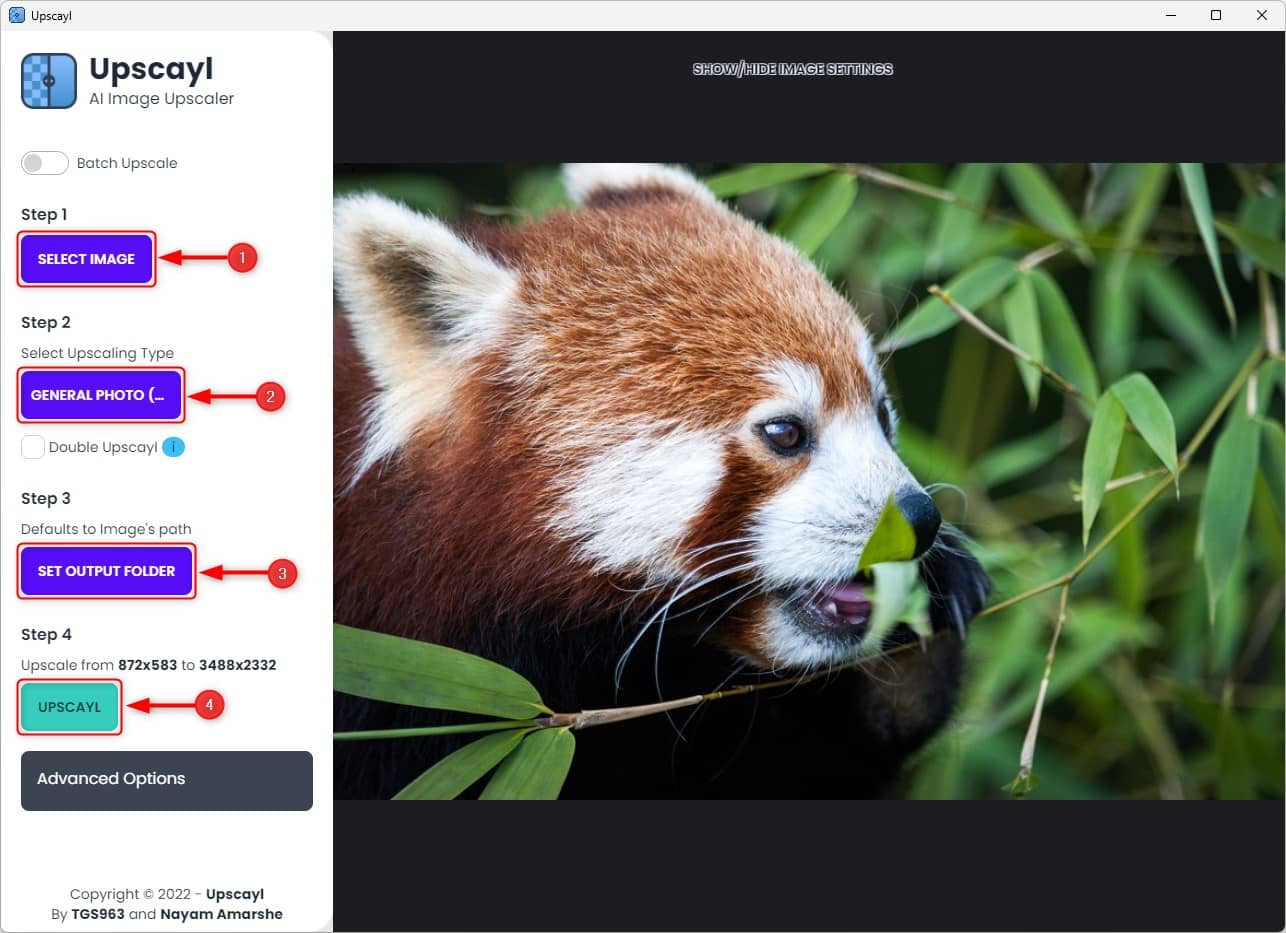
The software can be easily downloaded and installed on Windows, Linux, and macOS, and the interface is simple and user-friendly. With just a few clicks, you can let the “magic” happen (as the developers call it) and see the results yourself. Moreover, Upscayl offers the “Batch Upscale” feature, which allows you to upscale multiple files by placing them in a designated folder. This significantly increases productivity, although it’s advisable to double-check the results.
How to use Upscayl software to enlarge and improve the quality of your images or photos?
1. Start by downloading the Upscayl software from the GitHub platform. For example, click the upscale-2.0.1-win.exe link for Windows under the “Assets” section.
2. Then proceed to install the software and then run it.
3. From the Upscayl interface, click “ Select image ” to select the image you wish to enlarge and enhance.
4. Then select the type of scaling (upscaling).
5. Select the destination directory, and if you wish, from the “Advanced Options” menu, you can choose the output image format (PNG, JPG, or WebP).
6. Finally, click the “ Upscayl ” button to start upscaling.

7. Wait for the whole process. It usually only takes a few seconds.
8. After using the Upscale software to generate a new image, you can compare it with your original image. If you are satisfied with the result, you can locate the newly generated image in the folder that you designated earlier. However, if the result is not up to your liking, you can try upscaling again using a different method.
A very satisfying result… but with some limitations
We have mentioned the importance of “verification,” but let us assure you that the upscaling performed by the software is high quality and meets expectations. However, it is essential to note that the software may alter the style of the image during the rendering process.
It is crucial to understand the difference between size and resolution. The size of the image refers to its height and width, which is essential for printing purposes. On the other hand, resolution determines the level of detail and quality of the rendering, and a higher resolution produces better results.
One minor issue with the AI’s exceptional upscaling is that the output may appear overly smooth. Therefore, you must experiment with different scaling options, such as “Remacri” or “Real Esrgan,” until you achieve the desired outcome.
This quality is also advantageous since the software offers multiple scaling options. Despite their somewhat complex names, we recommend trying them to see what works best for you.
Overall, this free tool does an excellent job. When exporting, you can select from three formats: .png, .jpg, and .webp. This tool can transform your photos and artwork, giving them a new appearance without wasting time.
Did you like this article? Do not hesitate to share it on social networks and subscribe to Tech To Geek on Google News to not miss any articles!"Because of the Google update, I, like many other blogs, lost a lot of traffic."
Join the Newsletter
Please, subscribe to get our latest content by email.

